It’s Time to Begin Spring Planting!
I’d like to share a VERY easy way to propagate new perennial
plants. Creating no-fuss, mini
greenhouses is fun and nearly foolproof!
Please read this entire set of instructions prior to beginning this
project.
Many seeds require stratification before they
germinate. Stratification is the process
of subjecting seeds to cold temperatures for a period of time, as happens outdoors
when seeds fall to the ground and are subjected to our winter weather. The following plants represent those I’ve
grown using this process: Black-eyed
Susan, Butterfly Milkweed, Purple Coneflower, Monarda, Joe Pye Weed, and Blackberry
Lily.
If you have access to gallon-size plastic milk jugs, a drill
with a smallish bit or an awl, a sharp knife or scissors, potting soil, seeds,
duct tape, and a label-maker or permanent ink marker, roll up your sleeves! You’re ready to create your first
mini-greenhouse.
Discard the milk jug cap. Drill, or carefully poke with your awl,
several holes in the bottom of each milk jug.
With your permanent marker, draw a horizontal line from one side of the
base of the handle all the way around the jug to the other side of the
handle. The handle area will be the
greenhouse “hinge.” Cut along the line
with your sharp knife or scissors.
Carefully fold back the top of the jug; filling the bottom
with potting soil to a depth of approximately three inches. Poke several ¼ to ½” deep holes with your
finger, place a seed or two in each hole. Cover the holes with additional soil. If the soil is quite dry, dampen it with a
spritz or two of water. I use an old window
cleaner bottle filled with plain water.
The best way to identify the type of seed in each jug is to
label twice. One label will remain
inside the jar, written in permanent ink or marker, either in the soil or taped
inside the jug. Write the other label on
the outside of the jug. The outer label
often fades by Spring.
Re-situate the top of the milk jug, using duct tape to
securely fasten the top to the bottom. You
threw away the lid because precipitation, in the form of winter snow and spring
rain, must reach the soil in your mini-greenhouse.
January and/or early February is the perfect time to set mini-greenhouses
outdoors. Locate a somewhat sunny area
that’s not sheltered by an overhanging roof and not subject to wind gusts. I usually put mine on the easterly or
southerly side of the house, next to leafless bushes and raised garden beds.
A third hindrance to success is placing the milk jugs in an
area subject to being covered by drifted snow.
Slow melting snow drifts would prevent your green house from receiving sunlight,
warmth, and proper amounts of moisture, all of which are necessary for germination
and plant growth.
Now, enjoy your mini-greenhouses! Peek in there periodically, just for
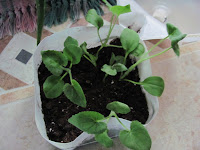
fun! You should see some seedlings in
April. When all danger of frost is gone,
remove the duct tape and remove the greenhouse tops. You’ve placed the jugs in sheltered areas, so
let spring breezes toughen the seedlings.
When it’s time to plant, scoop out your seedlings carefully, and set in
the ground with a little slow-release fertilizer.
This is a wonderful way to gain new plants for your
garden. You MAY grow more plants than
you need, so share them with friends and family members!! We’d like to know how you do! Submit your results to “Dear Iris” this
Spring!


No comments:
Post a Comment
Please type your message in the comment box below the post. If you want to communicate directly with one of us, use the e-mail address: gardenersmaster@yahoo.com.